Paper Link
Why Transformer?
Transformer는 2017년에 등장해 NLP 분야에서 혁신적인 성과를 이끌어낸 논문이다. 비단 NLP뿐만이 아니라 다른 ML Domain 내에서도 수없이 활용되고 있다.
Transformer의 가장 큰 contribution은 이전의 RNN(Recurrent Neural Network) model이 불가능했던 병렬 처리를 가능케 했다는 점이다. GPU를 사용함으로써 얻는 가장 큰 이점은 병렬 처리를 한다는 것인데, RNN과 같은 model은 GPU 발전의 혜택을 제대로 누리지 못했다. 앞으로 GPU의 발전은 더욱 가속화될 것이기에, Recurrent network의 한계는 점점 더 두드러질 것이다. Recurrent network를 사용하는 이유는 텍스트, 음성 등의 sequential한 data를 처리하기 위함인데, sequential하다는 것은 등장 시점(또는 위치)을 정보로 취급한다는 의미이다. 따라서 context vector를 앞에서부터 순차적으로 생성해내고, 그 context vector를 이후 시점에서 활용하는 방식으로 구현한다. 즉, 이후 시점의 연산은 앞 시점의 연산에 의존적이다. 따라서 앞 시점의 연산이 끝나지 않을 경우, 그 뒤의 연산을 수행할 수 없다. 이러한 이유로 RNN 계열의 model은 병렬 처리를 제대로 수행할 수 없다.
Transformer는 이를 극복했다. Attention 개념을 도입해 어떤 특정 시점에 집중하고, Positional Encoding을 사용해 sequential한 위치 정보를 보존했으며, 이후 시점에 대해 masking을 적용해 이전 시점의 값만이 이후에 영향을 미치도록 제한했다. 그러면서도 모든 과정을 병렬처리 가능하도록 구현했다. Transformer를 직접 pytorch를 사용해 구현하고, 학습시키며 이러한 특징들을 이해해보자. 본 포스트의 모든 code는 Harvard NLP를 참조해 작성했다.
Prerequisite
Machine Learning에 대한 기본적인 지식(Back Propagation, Activation Function, Optimizer, Softmax, KL Divergence, Drop-out, Normalization, Regularization, RNN 등)과 NLP의 기본적인 지식(tokenizing, word embedding, vocabulary, Machine Translation, BLEU Score 등)을 안다고 가정한다. 또한 Python, pytorch를 사용해 간단한 model을 만들어낼 수 있다는 것을 전제로 한다.
Model of Transformer
Transformer의 개괄적인 구조
Transformer는 input sentence를 넣어 output sentence를 생성해내는 model이다. input과 동일한 sentence를 만들어낼 수도, input의 역방향 sentence를 만들어낼 수도, 같은 의미의 다른 언어로 된 sentence를 만들어낼 수도 있다. 이는 model의 train 과정에서 정해지는 것으로, label을 어떤 sentence로 정할 것인가에 따라 달라진다. 결국 Transformer는 sentence 형태의 input을 사용해 sentence 형태의 output을 만들어내는 함수로 이해할 수 있다.

전체적인 생김새를 살펴보자.
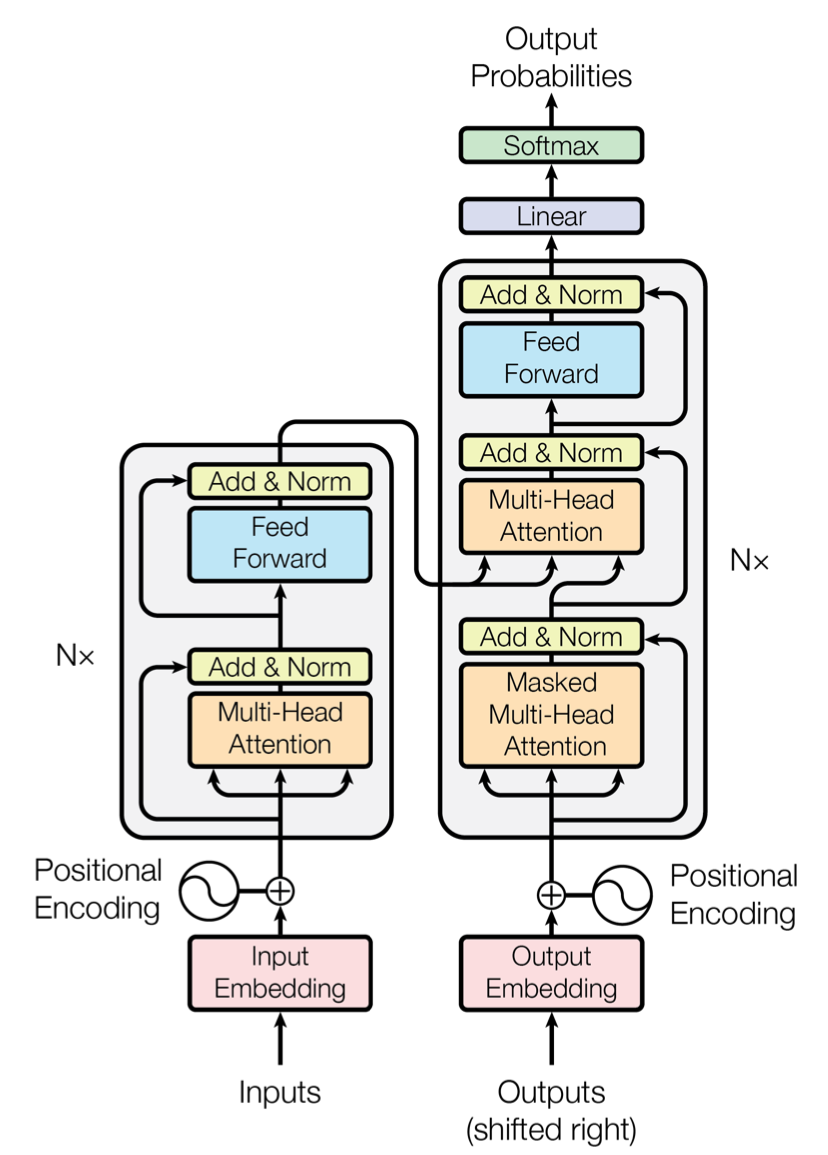
출처: Attention is All You Need [https://arxiv.org/pdf/1706.03762.pdf]
Transformer는 크게 Encoder와 Decoder로 구분된다. 부수적인 다른 구성 요소들이 있으나, Encoder와 Decoder가 가장 핵심이다. Encoder는 위 그림에서 좌측, Decoder는 위 그림에서 우측을 의미한다.
Encoder와 Decoder를 자세히 분석하기 이전에, 각각을 함수 형태로 이해해보자. Encoder는 sentence를 input으로 받아 하나의 vector를 생성해는 함수이다. 이러한 과정을 Encoding이라고 한다. Encoding으로 생성된 vector는 context라고 부르는데, 말그대로 문장의 ‘문맥’을 함축해 담은 vector이다. Encoder는 이러한 context를 제대로 생성(문장의 정보들을 빠뜨리지 않고 압축)해내는 것을 목표로 학습된다.

Decoder는 Encoder와 방향이 반대이다. context를 input으로 받아 sentence를 output으로 생성해낸다. 이러한 과정을 Decoding이라고 한다. 사실 Decoder는 input으로 context만을 받지는 않고, output으로 생성해내는 sentence를 right shift한 sentence도 함께 입력받지만, 자세한 것은 당장 이해할 필요 없이 단순히 어떤 sentence도 함께 input으로 받는 다는 개념만 잡고 넘어가자. 정리하자면, Decoder는 sentence, context를 input으로 받아 sentence를 만들어내는 함수이다.

Encoder와 Decoder에 모두 context vector가 등장하는데, Encoder는 context를 생성해내고, Decoder는 context를 사용한다. 이러한 흐름으로 Encoder와 Decoder가 연결되어 전체 Transformer를 구성하는 것이다.
지금까지의 개념을 바탕으로 아주 간단한 Transformer model을 pytorch로 구현해보자. encoder와 decoder가 각각 완성되어 있다고 가정하고, 이를 class 생성자의 인자로 받는다.
class Transformer(nn.Module):

    def __init__(self, encoder, decoder):
        super(Transformer, self).__init__()
        self.encoder = encoder
        self.decoder = decoder


    def encode(self, x):
        out = self.encoder(x)
        return out


    def decode(self, z, c):
        out = self.decode(z, c)
        return out


    def forward(self, x, z):
        c = self.encode(x)
        y = self.decode(z, c)
        return y
Encoder

Encoder는 위와 같은 구조로 이루어져 있다. Encoder Block이 \(N\)개 쌓여진 형태이다. 논문에서는 \(N=6\)을 사용했다. Encoder Block은 input과 output의 형태가 동일하다. 어떤 matrix를 input으로 받는다고 했을 때, Encoder Block이 도출해내는 output은 input과 완전히 동일한 shape를 갖는 matrix가 된다. 즉, Encoder Block은 shape에 대해 멱등(Idempotent)하다.
Encoder Block \(N\)개가 쌓여 Encoder를 이룬다고 했을 때, 첫번째 Encoder Block의 input은 전체 Encoder의 input으로 들어오는 문장 embdding이 된다. 첫번째 block이 output을 생성해내면 이를 두번째 block이 input으로 사용하고, 또 그 output을 세번째 block이 사용하는 식으로 연결되며, 가장 마지막 \(N\)번째 block의 output이 전체 Encoder의 output, 즉, context가 된다. 이러한 방식으로 block들이 연결되기 때문에, Encoder Block의 input과 output의 shape는 필연적으로 반드시 동일해야만 한다. 여기서 주목해야 하는 지점은 위에서 계속 언급했던 context 역시 Encoder의 input sentence와 동일한 shape를 가진다는 것이다. 즉, Encoder Block 뿐만 아니라 Encoder 전체도 shape에 대해 멱등(Idempotent)하다.
Encoder는 왜 여러 개의 block을 겹쳐 쌓는 것일까? 각 Encoder Block의 역할은 무엇일까? 결론부터 말하자면, 각 Encoder Block은 input으로 들어오는 vector에 대해 더 높은 차원(넓은 관점)에서의 context를 담는다. 높은 차원에서의 context라는 것은 더 추상적인 정보라는 의미이다. Encoder Block은 내부적으로 어떠한 Mechanism을 사용해 context를 담아내는데, Encoder Block이 겹겹이 쌓이다 보니 처음에는 원본 문장에 대한 낮은 수준의 context였겠지만 이후 context에 대한 context, context의 context에 대한 context … 와 같은 식으로 점차 높은 차원의 context가 저장되게 된다. Encoder Block의 내부적인 작동 방식은 곧 살펴볼 것이기에, 여기서는 직관적으로 Encoder Block의 역할, Encoder 내부의 전체적인 구조만 이해하고 넘어가자.
지금까지의 개념을 바탕으로 Encoder를 간단하게 code로 작성해보자.
class Encoder(nn.Module):

    def __init__(self, encoder_block, n_layer):  # n_layer: Encoder Block의 개수
        super(Encoder, self).__init__()
        self.layers = []
        for i in range(n_layer):
            self.layers.append(copy.deepcopy(encoder_block))


    def forward(self, x):
        out = x
        for layer in self.layers:
            out = layer(out)
        return out
forward()를 주목해보자. Encoder Block들을 순서대로 실행하면서, 이전 block의 output을 이후 block의 input으로 넣는다. 첫 block의 input은 Encoder 전체의 input인 x가 된다. 이후 가장 마지막 block의 output, 즉 context를 return한다.
Encoder Block

Encoder Block은 크게 Multi-Head Attention Layer, Position-wise Feed-Forward Layer로 구성된다. 각각의 layer에 대한 자세한 설명은 아래에서 살펴보도록 하고, 우선은 Encoder Block의 큰 구조만을 사용해 간단하게 구현해보자.
class EncoderBlock(nn.Module):

    def __init__(self, self_attention, position_ff):
        super(EncoderBlock, self).__init__()
        self.self_attention = self_attention
        self.position_ff = position_ff


    def forward(self, x):
        out = x
        out = self.self_attention(out)
        out = self.position_ff(out)
        return out
What is Attention?
Multi-Head Attention은 Scaled Dot-Proudct-Attention을 병렬적으로 여러 개 수행하는 layer이다. 때문에 Multi-Head Attention을 이해하기 위해서는 Scaled Dot-Product Attention에 대해 먼저 알아야만 한다. Attention이라는 것은 넓은 범위의 전체 data에서 특정한 부분에 집중한다는 의미이다. Scaled Dot-Product Attention 자체를 줄여서 Attention으로 부르기도 한다. 다음의 문장을 통해 Attention의 개념을 이해해보자.
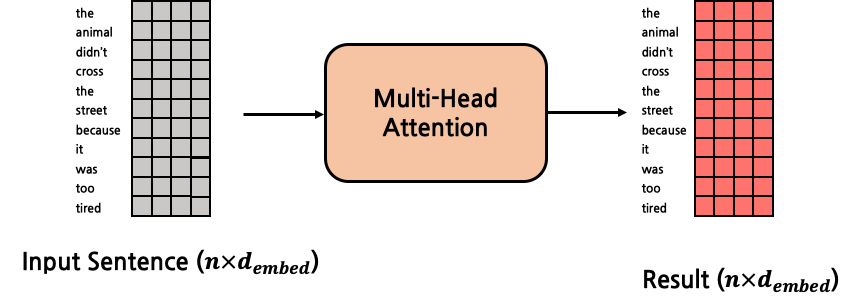
The animal didn’t cross the street, because it was too tired.
위 문장에서 ‘it’은 무엇을 지칭하는 것일까? 사람이라면 직관적으로 ‘animal’과 연결지을 수 있지만, 컴퓨터는 ‘it’이 ‘animal’을 가리키는지, ‘street’를 가리키는지 알지 못한다. Attention은 이러한 문제를 해결하기 위해 두 token 사이의 연관 정도를 계산해내는 방법론이다. 위의 경우에는 같은 문장 내의 두 token 사이의 Attention을 계산하는 것이므로, Self-Attention이라고 부른다. 반면, 서로 다른 두 문장에 각각 존재하는 두 token 사이의 Attention을 계산하는 것을 Cross-Attention이라고 부른다.
RNN vs Self-Attention
Transformer에서 벗어나, 이전 RNN의 개념을 다시 생각해보자. RNN은 이전 시점까지 나온 token들에 대한 hidden state 내부에 이전 정보들을 저장했다. RNN의 경우 hidden state를 활용해 이번에 등장한 ‘it’이 이전의 ‘The Animal’을 가리킨다는 것을 알아낼 것이다. Self-Attention 역시 동일한 효과를 내는 것을 목적으로 하나, Recurrent Network에 비해 크게 아래와 같은 2가지 장점을 갖는다.
- Recurrent Network는 \(i\)시점의 hidden state \(h_i\)를 구하기 위해서는 \(h_{i-1}\)가 필요했다. 결국, 앞에서부터 순차 계산을 해나가 \(h_0, h_1, ... , h_n\)을 구하는 방법밖에 없었기에 병렬 처리가 불가능했다. 하지만 Self-Attention은 모든 token 쌍 사이의 attention을 한 번의 행렬 곱으로 구해내기 때문에 손쉽게 병렬 처리가 가능하다.
- Recurrent Network는 시간이 진행될수록 오래된 시점의 token에 대한 정보가 점차 희미해져간다. 위 문장의 예시에서 현재 ‘didn’t’의 시점에서 hidden state를 구한다고 했을 때, 바로 직전의 token인 ‘animal’에 대한 정보는 뚜렷하게 남아있다. 하지만 점차 앞으로 나아갈수록, ‘because’나 ‘it’의 시점에서는 ‘didn’t’ 시점보다는 ‘animal’에 대한 정보가 희미하게 남게 된다. 결국, 서로 거리가 먼 token 사이의 관계에 대한 정보가 제대로 반영되지 못하는 것이다. 반면, Self-Attention은 문장에 token이 \(n\)개 있다고 가정할 경우, \(n \times n\) 번 연산을 수행해 모든 token들 사이의 관계를 직접 구해낸다. 중간의 다른 token들을 거치지 않고 바로 direct한 관계를 구하는 것이기 때문에 Recurrent Network에 비해 더 명확하게 관계를 잡아낼 수 있다.
Query, Key, Value
지금까지는 추상적으로 Attention에 대한 개념 및 장단점을 살펴봤다. 이제 구체적으로 어떤 방식으로 행렬 곱셈을 사용해 Attention이 수행되는지 알아보자. 우선은 문제를 단순화하기 위해 Cross-Attention이 아닌 Self-Attention의 경우를 보겠다. 위의 예시 문장을 다시 가져와보자.
The animal didn’t cross the street, because it was too tired.
Attention 계산에는 Query, Key, Value라는 3가지 vector가 사용된다. 각 vector의 역할을 정리하면 다음과 같다.
- Query: 현재 시점의 token을 의미
- Key: attention을 구하고자 하는 대상 token을 의미
- Value: attention을 구하고자 하는 대상 token을 의미 (Key와 동일한 token)
위 문장에서 ‘it’이 어느 것을 지칭하는지 알아내고자 하는 상황이다. 그렇다면 ‘it’ token과 문장 내 다른 모든 token들에 대해 attention을 구해야 한다. 이 경우에는 Query는 ‘it’으로 고정이다. Key, Value는 서로 완전히 같은 token을 가리키는데, 문장의 시작부터 끝까지 모든 token들 중 하나가 될 것이다. Key와 Value가 ‘The’를 가리킬 경우 ‘it’과 ‘The’ 사이의 attention을 구하는 것이고, Key와 Value가 마지막 ‘tired’를 가리킬 경우 ‘it’과 ‘tired’ 사이의 attention을 구하는 것이 된다. 즉, Key와 Value는 문장의 처음부터 끝까지 탐색한다고 이해하면 된다. Query는 고정되어 하나의 token을 가리키고, Query와 가장 부합하는(Attention이 가장 높은) token을 찾기 위해서 Key, Value를 문장의 처음부터 끝까지 탐색시키는 것이다. 각각의 의미는 이해했으나, Key와 Value가 완전히 같은 token을 가리킨다면 왜 두 개가 따로 존재하는지 의문이 들 수 있다. 이는 이후에 다룰 것이나, 결론부터 말하자면 Key와 Value의 실제 값은 다르지만 의미적으로는 여전히 같은 token을 의미한다. Key와 Value는 이후 Attention 계산 과정에서 별개로 사용하게 된다.
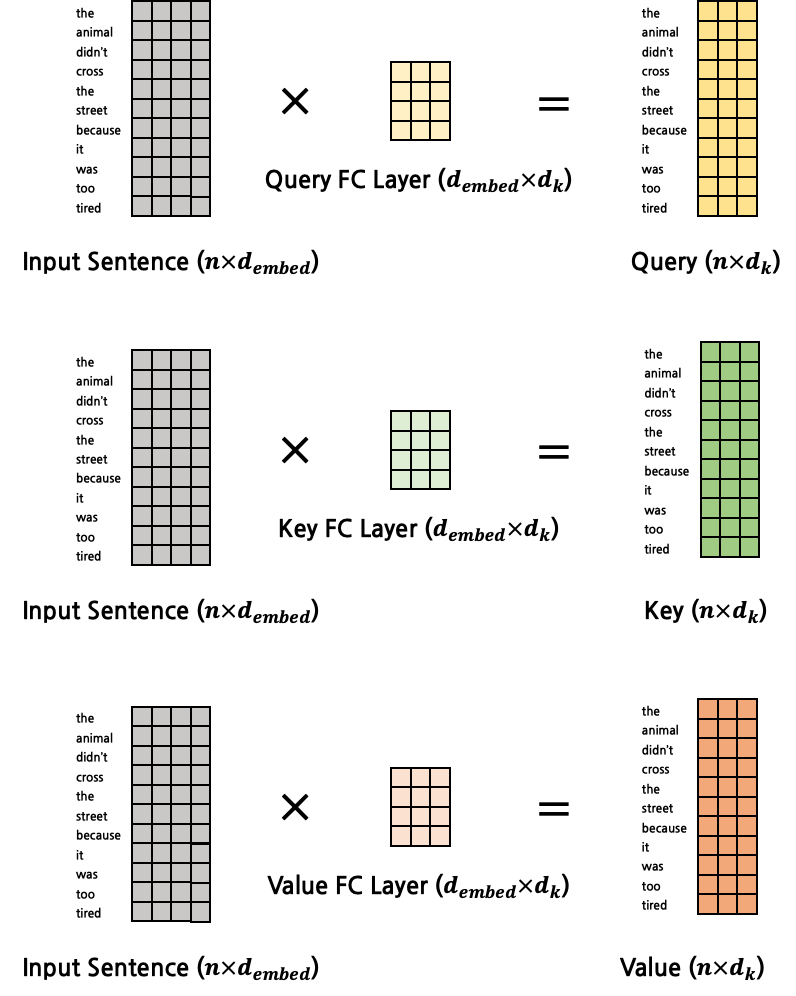
Query, Key, Value가 각각 어떤 token을 가리키는지는 이해가 됐을 것이다. 하지만, 그래서 Query, Key, Value라는 세 vector의 구체적인 값은 어떻게 만들어지는지는 우리는 아직 알지 못한다. 정말 간단하게도, input으로 들어오는 token embedding vector를 fully connected layer에 넣어 세 vector를 생성해낸다. 세 vector를 생성해내는 FC layer는 모두 다르기 때문에, 결국 self-attention에서는 Query, Key, Value를 구하기 위해 3개의 서로 다른 FC layer가 존재한다. 이 FC layer들은 모두 같은 input shape, output shape를 갖는다. input shape가 같은 이유는 당연하게도 모두 다 동일한 token embedding vector를 input으로 받기 때문이다. 한편, 세 FC layer의 output shape가 같다는 것을 통해 각각 별개의 FC layer로 구해진 Query, Key, Value가 구체적인 값은 다를지언정 같은 shape를 갖는 vector가 된다는 것을 알 수 있다. 정리하자면, Query, Key, Value의 shape는 모두 동일하다. 앞으로 이 세 vector의 dimension을 \(d_k\)로 명명한다. 여기서 \(k\)는 Key를 의미하는데, 굳이 Query, Key, Value 중 Key를 이름으로 채택한 이유는 특별히 있지 않고, 단지 논문의 notation에서 이를 채택했기 때문이다. 이제 위에서 얘기했던 Key, Value가 다른 값을 갖는 이유를 이해할 수 있다. input은 같은 token embedding vector였을지라도 서로 다른 FC layer를 통해서 각각 Key, Value가 구해지기 때문에 같은 token을 가리키면서 다른 값을 갖는 것이다.
Scaled Dot-Product Attention
이제 Query, Key, Value를 활용해 Attention을 계산해보자. Attention이라고 한다면 어떤 것에 대한 Attention인지 불명확하다. 구체적으로, Query에 대한 Attention이다. 이 점을 꼭 인지하고 넘어가자. 이후부터는 Query, Key, Value를 각각 \(Q\), \(K\), \(V\)로 축약해 부른다. Query의 Attention은 다음과 같은 수식으로 계산된다.
\[\text{Query's Attention}\left( Q, K, V \right) = \text{softmax}\left( \frac{QK^T}{\sqrt{d_k}} \right) V\]그림으로 계산의 흐름을 표현하면 다음과 같다.
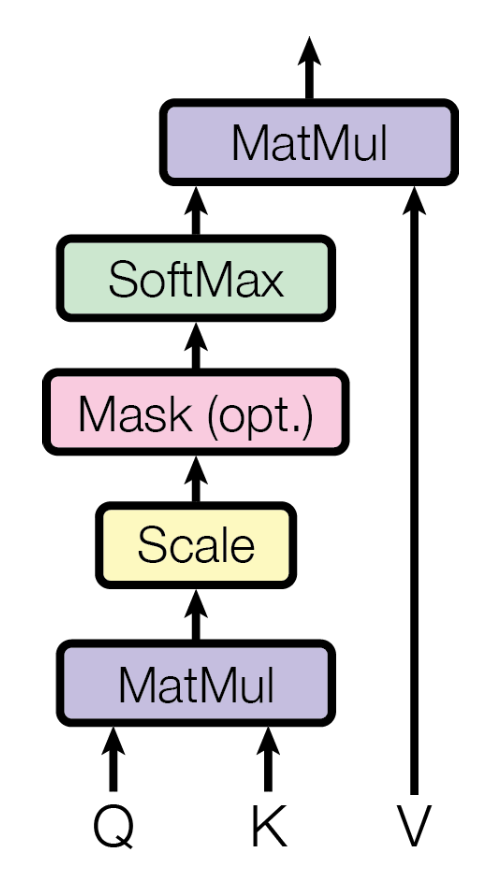
출처: Attention is All You Need [https://arxiv.org/pdf/1706.03762.pdf]
\(Q\)는 현재 시점의 token을, \(K\)와 \(V\)는 Attention을 구하고자 하는 대상 token을 의미했다. 우선은 빠른 이해를 돕기 위해 \(Q\), \(K\), \(V\)가 모두 구해졌다고 가정한다. 위의 예시 문장을 다시 가져와 ‘it’과 ‘animal’ 사이의 Attention을 구한다고 해보자. \(d_k=3\)이라고 한다면, 아래와 같은 모양일 것이다.

그렇다면 \(Q\)와 \(K\)를 MatMul(행렬곱)한다는 의미는 어떤 의미일까? 이 둘을 곱한다는 것은 둘의 Attention Score를 구한다는 것이다. \(Q\)와 \(K\)의 shape를 생각해보면, 둘 모두 \(d_k\)를 dimension으로 갖는 vector이다. 이 둘을 곱한다고 했을 때(정확히는 \(K\)를 transpose한 뒤 곱함, 즉 두 vector의 내적), 결과값은 어떤 scalar 값이 나오게 될 것이다. 이 값을 Attention Score라고 한다. 이후 scaling을 수행하는데, 값의 크기가 너무 커지지 않도록 \(\sqrt{d_k}\)로 나눠준다. 값이 너무 클 경우 gradient vanishing이 발생할 수 있기 때문이다. scaling을 제외한 연산 과정은 아래와 같다.

지금까지는 \(1:1\) Attention을 구했다면, 이를 확장시켜 \(1:N\) Attention을 구해보자. 그 전에 \(Q\), \(K\), \(V\)에 대한 개념을 다시 되짚어보자. \(Q\)는 고정된 token을 가리키고, \(Q\)가 가리키는 token과 가장 높은 Attention을 갖는 token을 찾기 위해 \(K\), \(V\)를 문장의 첫 token부터 마지막 token까지 탐색시키게 된다. 즉, Attention을 구하는 연산이 \(Q\) 1개에 대해서 수행된다고 가정했을 때, \(K\), \(V\)는 문장의 길이 \(n\)만큼 반복되게 된다. \(Q\) vector 1개에 대해서 Attention을 계산한다고 했을 때, \(K\)와 \(V\)는 각각 \(n\)개의 vector가 되는 것이다. 이 때 \(Q\), \(K\), \(V\) vector의 dimension은 모두 \(d_k\)로 동일할 것이다. 위의 예시 문장을 다시 갖고 와 ‘it’에 대한 Attention을 구하고자 할 때에는 \(Q\)는 ‘it’, \(K\), \(V\)는 문장 전체이다. \(K\)와 \(V\)를 각각 \(n\)개의 vector가 아닌 1개의 matrix로 표현한다고 하면 vector들을 concatenate해 \(n \times d_k\)의 matrix로 변환하면 된다. 그 결과 아래와 같은 shape가 된다.
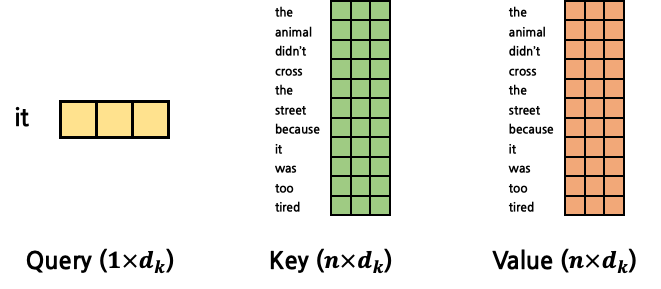
그렇다면 이들의 Attention Score는 아래와 같이 계산될 것이다.

그 결과 Attention Score는 \(1 \times n\)의 matrix가 되는데, 이는 \(Q\)의 token과 문장 내 모든 token들 사이의 Attention Score를 각각 계산한 뒤 concatenate한 것과 동일하다. 이를 행렬곱 1회로 수행한 것이다.
이렇게 구한 Attention Score는 softmax를 사용해 확률값으로 변환하게 된다. 그 결과 각 Attention Score는 모두 더하면 1인 확률값이 된다. 이 값들의 의미는 \(Q\)의 token과 해당 token이 얼마나 Attention을 갖는지(얼마나 연관성이 짙은지)에 대한 비율(확률값)이 된다. 임의로 Attention Probability라고 부른다(논문에서 사용하는 표현은 아니고, 이해를 돕기 위해 임의로 붙인 명칭이다). 이후 Attention Probability를 최종적으로 \(V\)와 곱하게 되는데, \(V\)(Attention을 구하고자 하는 대상 token, 다시 한 번 강조하지만 \(K\)와 \(V\)는 같은 token을 의미한다.)를 각각 Attention Probability만큼만 반영하겠다는 의미이다. 연산은 다음과 같이 이루어진다.

이렇게 구해진 최종 result는 기존의 \(Q\), \(K\), \(V\)와 같은 dimension(\(d_k\))를 갖는 vector 1개임을 주목하자. 즉, input으로 \(Q\) vector 1개를 받았는데, 연산의 최종 output이 input과 같은 shape를 갖는 것이다. 따라서 Self-Attention 연산 역시 shape에 멱등(Idempotent)하다. (Attention을 함수라고 했을 때 syntax 측면에서 엄밀히 따지자면 input은 \(Q\), \(K\), \(V\) 총 3개이다. 하지만 개념 상으로는 \(Q\)에 대한 Attention을 의미하는 것이므로 semantic 측면에서 input은 \(Q\)라고 볼 수 있다)
지금까지의 Attention 연산은 ‘it’이라는 한 token에 대한 Attention을 구한 것이다. 그러나 우리는 문장 내에서 ‘it’에 대한 Attention만 구하고자 하는 것이 아니다. 모든 token에 대한 Attention을 구해내야만 한다. 따라서 Query 역시 1개의 vector가 아닌 모든 token에 대한 matrix로 확장시켜야 한다.
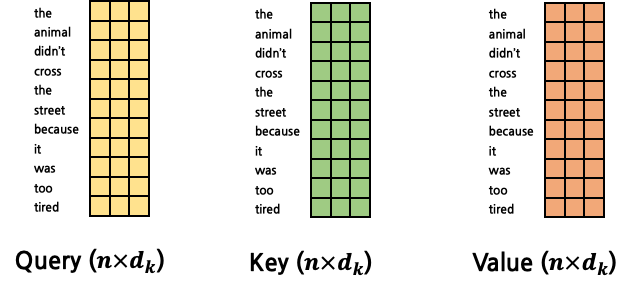
그렇다면 Attention을 구하는 연산은 아래와 같이 진행된다.
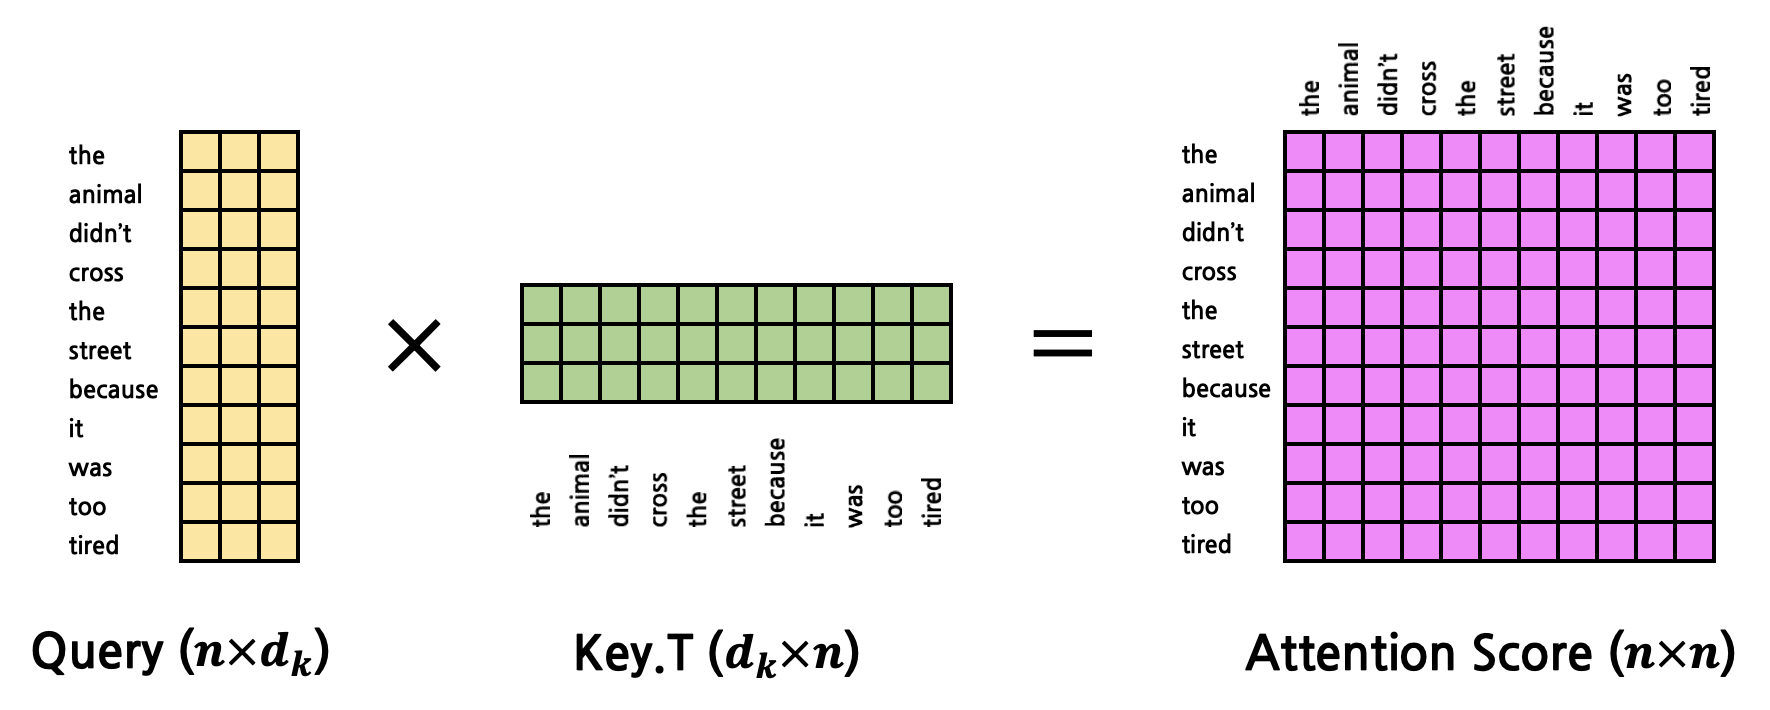
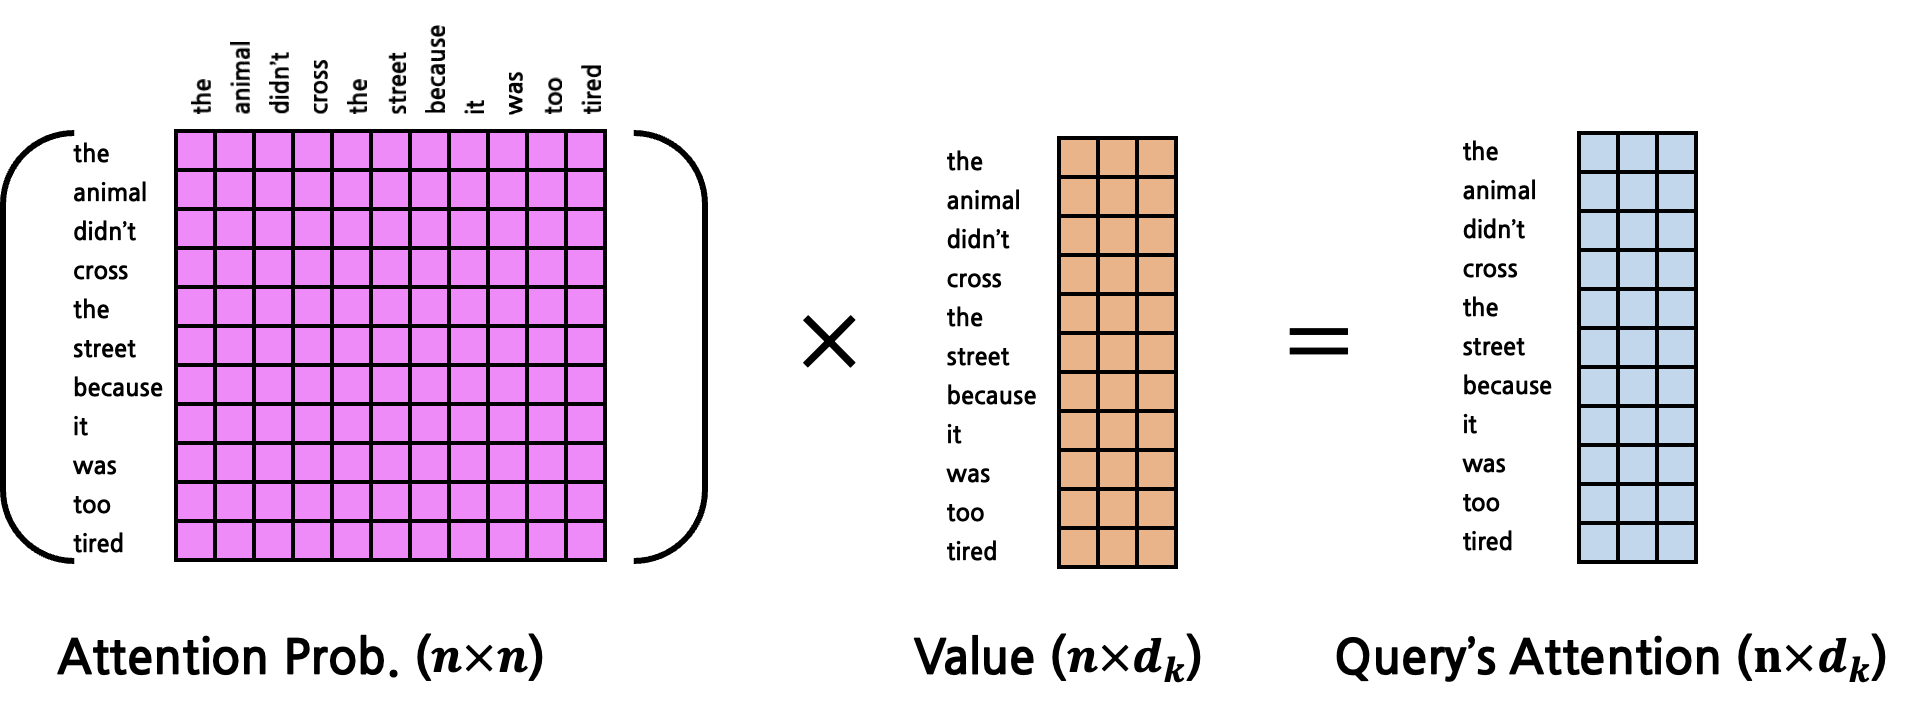
이제 여기까지 왔으면 \(Q\), \(K\), \(V\)가 주어졌을 때에 어떻게 Attention이 계산되는지 이해했을 것이다. 계속 반복되는 이야기이지만, Self-Attention에서 input(\(Q\))의 shape에 대해 멱등(Idempotent)하다.

\(Q\), \(K\), \(V\)를 구하는 FC layer에 대해 자세히 살펴보자. Self-Attention 개념 이전에 설명했듯이, 각각 서로 다른 FC layer에 의해 구해진다. FC layer의 input은 word embedding vector들이고, output은 각각 \(Q\), \(K\), \(V\)이다. word embedding의 dimension이 \(d_{embed}\)라고 한다면, input의 shape는 \(n \times d_{embed}\)이고, output의 shape는 \(n \times d_k\)이다. 각각의 FC layer는 서로 다른 weight matrix (\(d_{embed} \times d_k\))를 갖고 있기 때문에 output의 shape는 모두 동일할지라도, \(Q\), \(K\), \(V\)의 실제 값들은 모두 다르다.
Pad Masking
지금까지 다룬 Self-Attention에서 생략한 과정이 하나 있는데, 바로 masking이다. 사실 논문의 figure에 따르면 Self-Attention에는 masking 과정이 포함되어 있었다.

출처: Attention is All You Need [https://arxiv.org/pdf/1706.03762.pdf]
pad는 무엇을 의미하는 것일까? 예시 문장을 다시 가져와보자.
The animal didn’t cross the street, because it was too tired.
문장을 word 단위로 tokenize(단순히 python의 split()을 사용)한다면 token의 개수는 총 11개이다. 만약의 각 token의 embedding dimension이 \(d_{embed}\)라고 한다면, 문장 전체의 embedding matrix는 (\(11 \times d_{embed}\))일 것이다. 그런데 문장의 길이가 더 길거나 짧다면 그 때마다 input의 shape는 바뀌게 된다. 실제 model 학습 과정에서는 한 문장 씩이 아닌 mini-batch씩 여러 문장와야 하는데 각 문장 마다의 length가 다를 경우 batch를 만들어낼 수 없다. 이러한 문제를 해결하기 위해 \(\text{seq_len}\)(해당 mini-batch 내 token 개수의 최대 값)을 지정하게 되는데, 만약 \(\text{seq_len}\)이 20이라고 한다면 위 문장에서는 9개의 빈 token이 있게 된다. 그런데, 이렇게 생겨난 비어있는 pad token에는 attention이 부여되어서는 안된다. 실제로는 존재하지도 않는 token과 다른 token 사이의 attention을 찾아서 계산하고, 이를 반영하는 것은 직관적으로도 말이 안된다는 것을 알 수 있다. 따라서 이러한 pad token들에 대해 attention이 부여되지 않도록 처리하는 것이 pad masking이다. masking은 \((\text{seq_len} \times \text{seq_len})\) shape의 mask matrix를 곱하는 방식으로 이뤄지는데 mask matrix에서 pad token에 해당하는 row, column의 모든 값은 0이다. 그 외에는 모두 1이다. 이러한 연산은 scaling과 softmax 사이에 수행하게 되는데, 사실은 scaling 이전, 이후 언제 적용하든 차이는 없다. scaling은 단순히 모든 값을 \(d_k\)로 일괄 나누는 작업이기 때문이다. 대신 반드시 \(Q\)와 \(K\)의 행렬곱 이후, softmax 이전에 적용되어야 한다. mask matrix와 같은 shape는 \(Q\)와 \(K\)의 행렬곱 연산 이후에나 등장하기 때문이다. 또한 softmax는 등장하는 모든 값들을 반영해 확률값을 계산하게 되는데, 이 때 pad token의 값이 반영되어서는 안되므로 softmax 이전에는 반드시 masking이 수행되어야 한다.
Self-Attention Code in Pytorch
Self-Attention을 pytorch code로 구현해보자. Self-Attention은 Transformer에서의 가장 핵심적인 code이므로 반드시 이해하고 넘어가자. 여기서 주의해야 할 점은 실제 model에 들어오는 input은 한 개의 문장이 아니라 mini-batch이기 때문에 \(Q\), \(K\), \(V\)의 shape에 \(\text{n_batch}\)가 추가된다. Encoder가 받는 input의 shape는 \(\text{n_batch} \times \text{seq_len} \times d_{embed}\) 이었겠으나, 3개의 FC Layer를 거쳐 \(Q\), \(K\), \(V\)는 각각 \(\text{n_batch} \times \text{seq_len} \times d_k\)의 shape를 갖는다. calculate_attention()의 인자로 받는 mask는 아마도 pad mask일텐데, 이 mask를 생성하는 code는 이후에 다뤄본다.
def calculate_attention(query, key, value, mask):
    # query, key, value: (n_batch, seq_len, d_k)
    # mask: (n_batch, seq_len, seq_len)
    d_k = key.shape[-1]
    attention_score = torch.matmul(query, key.transpose(-2, -1)) # Q x K^T, (n_batch, seq_len, seq_len)
    attention_score = attention_score / math.sqrt(d_k)
    if mask is not None:
        attention_score = attention_score.masked_fill(mask==0, -1e9)
    attention_prob = F.softmax(attention_score, dim=-1) # (n_batch, seq_len, seq_len)
    out = torch.matmul(attention_prob, value) # (n_batch, seq_len, d_k)
    return out
Multi-Head Attention Layer
출처: Attention is All You Need [https://arxiv.org/pdf/1706.03762.pdf]
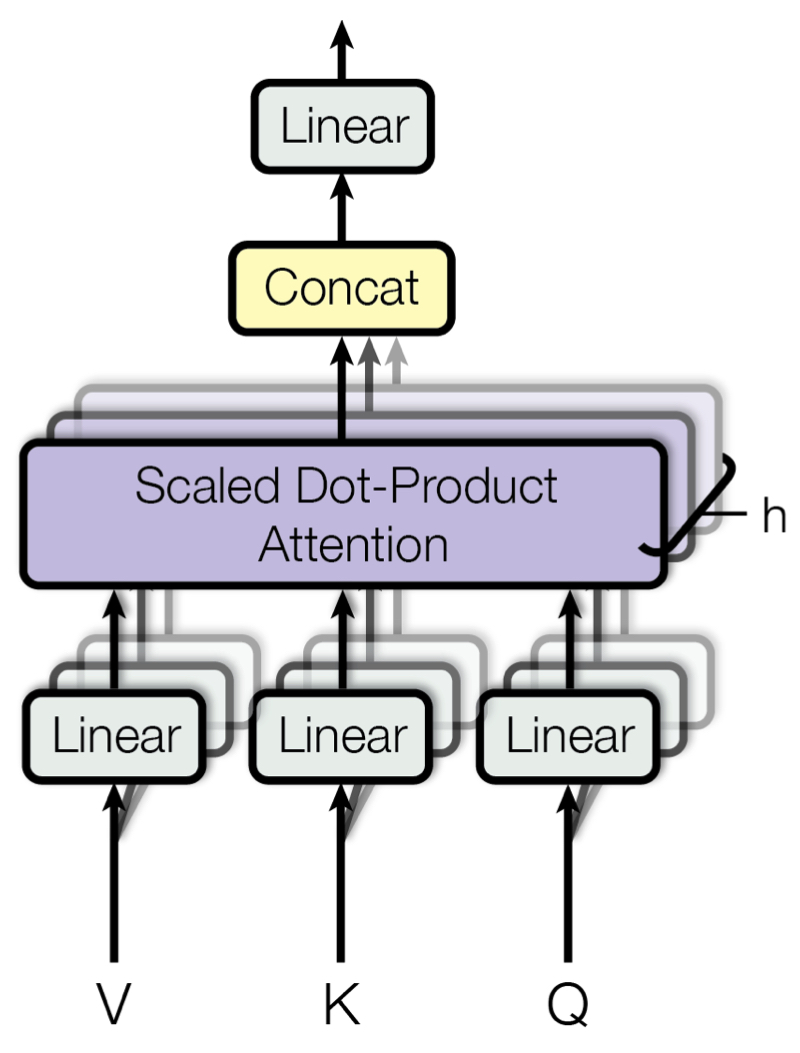
지금까지의 Self-Attention에 대한 개념은 모두 Multi-Head Attention Layer를 이해하기 위한 것이었다. Attention 계산을 논문에서는 Scaled Dot-Product Attention이라고 명명한다. Transformer는 Scaled Dot Attention을 한 Encoder Layer마다 1회씩 수행하는 것이 아니라 병렬적으로 \(h\)회 각각 수행한 뒤, 그 결과를 종합해 사용한다. 이 것이 Multi-Head Attention이다. 이러한 연산을 수행하는 이유는 다양한 Attention을 잘 반영하기 위해서이다. 만약 하나의 Attention만 반영한다고 했을 때, 예시 문장에서 ‘it’의 Attention에는 ‘animal’의 것이 대부분을 차지하게 될 것이다. 하지만 여러 종류의 attention을 반영한다고 했을 때 ‘tired’에 집중한 Attention까지 반영된다면, 최종적인 ‘it’의 Attention에는 ‘animal’이라는 지칭 정보, ‘tired’ 이라는 상태 정보까지 모두 담기게 될 것이다. 이 것이 Multi-Head Attention을 사용하는 이유이다.
구체적인 연산 방법을 살펴보자. 논문에서는 \(h=8\)을 채택했다. Scaled Dot-Product Attention에서는 \(Q\), \(K\), \(V\)를 위해 FC layer가 총 3개 필요했었는데, 이를 \(h\)회 수행한다고 했으므로 \(3*h\)개의 FC layer가 필요하게 된다. 각각 연산의 최종 output은 \(n \times d_k\)의 shape인데, 총 \(h\)개의 \(n \times d_k\) matrix를 모두 concatenate해서 \(n \times (d_k*h)\)의 shape를 갖는 matrix를 만들어낸다. (\(n\)은 token의 개수로, 사실상 \(\text{seq_len}\)이다. notation의 단순화를 위해 \(n\)으로 잠시 변경한다.) 이 때 \(d_k*h\)의 값을 \(d_{model}\)로 명명한다. \(d_{model}=d_k*h\) 수식은 실제 코드 구현에서 매우 중요한 개념이므로 꼭 기억하고 넘어가자. 대개 \(d_{model}\)은 Encoder의 input으로 들어오는 shape인 \(d_{embed}\)와 동일한 값을 사용한다. \(d_{model}\)과 \(d_{embed}\)의 구분이 어렵다면, 사실상 서로 동일한 값이라고 봐도 무방하다.
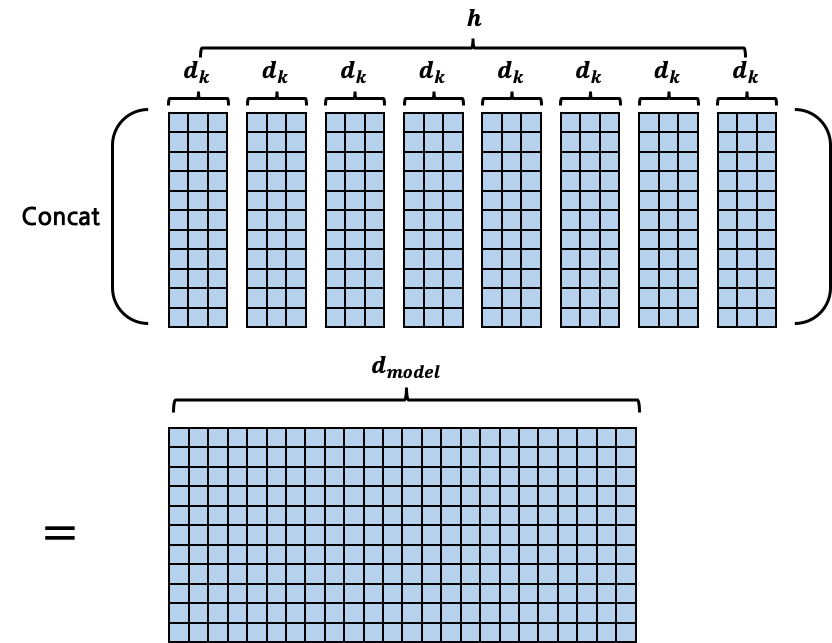
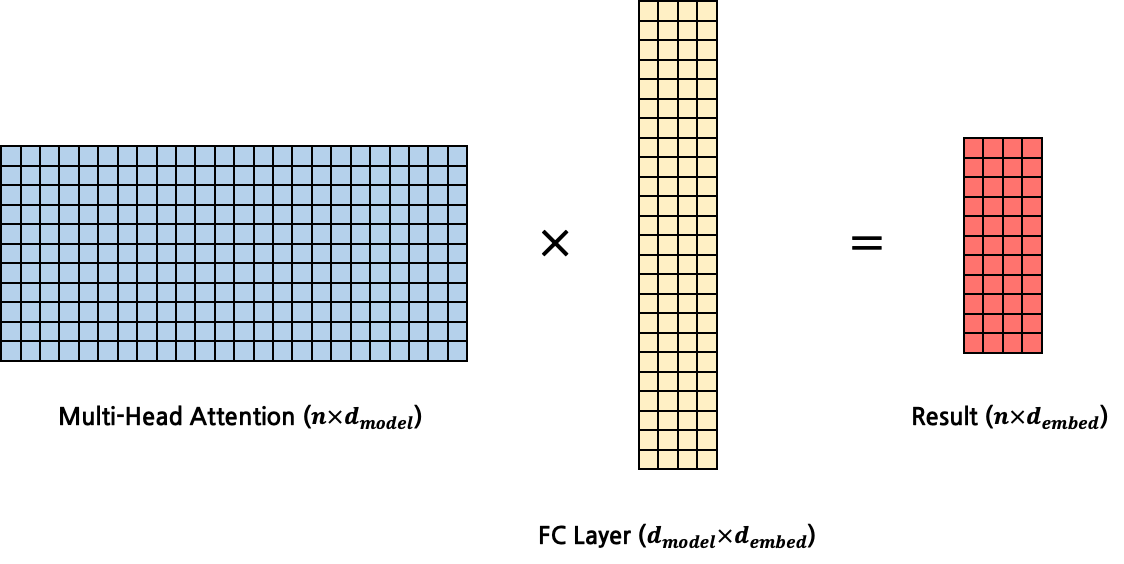
사실 위의 설명은 개념 상의 이해를 돕기 위한 것이고, 실제 연산은 병렬 처리를 위해 더 효율적인 방식으로 수행된다. 기존의 설명에서 \(Q\), \(K\), \(V\)를 구하기 위한 FC layer는 \(d_{embed}\)를 \(d_k\)로 변환했다. 이렇게 구해낸 \(Q\), \(K\), \(V\)로 각각의 Attention을 계산해 concatenate하는 방식은 별개의 Attention 연산을 총 \(h\)회 수행해야 한다는 점에서 매우 비효율적이다. 따라서 실제로는 \(Q\), \(K\), \(V\) 자체를 \(n \times d_k\)가 아닌, \(n \times d_{model}\)로 생성해내서 한 번의 Self-Attention 계산으로 \(n \times d_{model}\)의 output을 만들어내게 된다. 때문에 \(Q\), \(K\), \(V\)를 생성해내기 위한 \(d_{embed} \times d_k\)의 weight matrix를 갖는 FC layer를 \(3*h\)개 운용할 필요 없이 \(d_{embed} \times d_{model}\)의 weight matrix를 갖는 FC layer를 \(3\)개만 운용하면 된다.
여기서 우리가 주목해야 하는 지점은 다양한 Attention을 반영한다는 Multi-Head Attention의 심오한 개념은 실제 구현상으로는 단지 \(d_k\)의 크기를 \(d_{model}\)로 확장시키는 단순한 변경으로 끝난다는 점이다. 때문에 사람에 따라서는 Multi-Head Attention을 다양한 Attention을 반영한다기 보다는 \(Q\), \(K\), \(V\) vector에는 담을 수 있는 정보의 양이 \(d_k\)의 dimension으로는 절대적으로 너무 작기 때문에 더 많은 정보를 담아내기 위해 \(Q\), \(K\), \(V\) vector의 dimension을 늘린 것으로 이해하기도 한다.
다시 본론으로 되돌아와서 최종적으로 생성해된 matrix \((n \times d_{model})\)를 FC layer에 넣어 multi-head attention의 input과 같은 shape(\(n \times d_{embed}\))의 matrix로 변환하는 과정이 필요하다. 따라서 마지막 FC layer의 input dimension은 \(d_{model}\), output dimension은 \(d_{embed}\)가 된다. 이는 multi-head attention layer도 하나의 함수라고 생각했을 때, input의 shape와 output의 shape가 동일하게 하기 위함이다.
Multi-Head Attention Code in Pytorch
Multi-Head Attention Layer를 실제 code로 구현해보자. 위에서 구현했던 calculate_attention()을 사용한다.
class MultiHeadAttentionLayer(nn.Module):

    def __init__(self, d_model, h, qkv_fc, out_fc):
        super(MultiHeadAttentionLayer, self).__init__()
        self.d_model = d_model
        self.h = h
        self.q_fc = copy.deepcopy(qkv_fc) # (d_embed, d_model)
        self.k_fc = copy.deepcopy(qkv_fc) # (d_embed, d_model)
        self.v_fc = copy.deepcopy(qkv_fc) # (d_embed, d_model)
        self.out_fc = out_fc              # (d_model, d_embed)

        ...
우선 생성자를 살펴보자. qkv_fc 인자로 \(d_{embed} \times d_{model}\)의 weight matrix를 갖는 FC Layer를 받아 멤버 변수로 \(Q\), \(K\), \(V\)에 대해 각각 copy.deepcopy를 호출해 저장한다. deepcopy를 호출하는 이유는 실제로는 서로 다른 weight를 갖고 별개로 운용되게 하기 위함이다. copy 없이 하나의 FC Layer로 \(Q\), \(K\), \(V\)를 모두 구하게 되면 항상 \(Q\), \(K\), \(V\)가 모두 같은 값일 것이다. out_fc는 attention 계산 이후 거쳐가는 FC Layer로, \(d_{model} \times d_{embed}\)의 weight matrix를 갖는다.
가장 중요한 forward()이다. Transformer 구현에서 가장 핵심적인 부분이므로 반드시 이해하고 넘어가자.
 class MultiHeadAttentionLayer(nn.Module):

        ...

    def forward(self, *args, query, key, value, mask=None):
        # query, key, value: (n_batch, seq_len, d_embed)
        # mask: (n_batch, seq_len, seq_len)
        # return value: (n_batch, h, seq_len, d_k)
        n_batch = query.size(0)

        def transform(x, fc):  # (n_batch, seq_len, d_embed)
            out = fc(x)        # (n_batch, seq_len, d_model)
            out = out.view(n_batch, -1, self.h, self.d_model//self.h) # (n_batch, seq_len, h, d_k)
            out = out.transpose(1, 2) # (n_batch, h, seq_len, d_k)
            return out

        query = transform(query, self.q_fc) # (n_batch, h, seq_len, d_k)
        key = transform(key, self.k_fc)     # (n_batch, h, seq_len, d_k)
        value = transform(value, self.v_fc) # (n_batch, h, seq_len, d_k)

        out = self.calculate_attention(query, key, value, mask) # (n_batch, h, seq_len, d_k)
        out = out.transpose(1, 2) # (n_batch, seq_len, h, d_k)
        out = out.contiguous().view(n_batch, -1, self.d_model) # (n_batch, seq_len, d_model)
        out = self.out_fc(out) # (n_batch, seq_len, d_embed)
        return out
인자로 받은 query, key, value는 실제 \(Q\), \(K\), \(V\) matrix가 아닌, input sentence embedding \((\text{n_batch} \times \text{seq_len} \times d_{embed})\) 이다. 이를 3개의 FC Layer에 넣어 \(Q\), \(K\), \(V\)를 구하는 것이다. Self-Attention이기에 당연히 \(Q\), \(K\), \(V\)는 같은 sentence에서 나오게 되는데 왜 별개의 인자로 받는지 의문일 수 있다. 이는 Decoder에서 활용하기 위함이기에, 추후에 이해할 수 있을 것이다. mask는 기본적으로 한 문장에 대해 (\(\text{seq_len} \times \text{seq_len}\))의 shape를 갖는데, mini-batch이므로 (\(\text{n_batch} \times \text{seq_len} \times \text{seq_len}\))의 shape를 갖는다.
transform()은 \(Q\), \(K\), \(V\)를 구하는 함수이다. 따라서 input shape는 (\(\text{n_batch} \times \text{seq_len} \times d_{embed}\))이고, output shape는 (\(\text{n_batch} \times \text{seq_len} \times d_{model}\))이어야 한다. 하지만 실제로는 단순히 FC Layer만 거쳐가는 것이 아닌 추가적인 변형이 일어난다. 우선 \(d_{model}\)을 \(h\)와 \(d_k\)로 분리하고, 각각을 하나의 dimension으로 분리한다. 따라서 shape는 (\(\text{n_batch} \times \text{seq_len} \times h \times d_k\))가 된다. 이후 이를 transpose해 (\(\text{n_batch} \times h \times \text{seq_len} \times d_k\))로 변환한다. 이러한 작업을 수행하는 이유는 위에서 작성했던 calculate_attention()이 input으로 받고자 하는 shape가 (\(\text{n_batch} \times ... \times \text{seq_len} \times d_k\))이기 때문이다. 아래에서 calculate_attention()의 code를 다시 살펴보자. 위에서 작성한 code에서 각 step마다 shape를 설명하는 주석만 변경됐다.
def calculate_attention(self, query, key, value, mask):
    # query, key, value: (n_batch, h, seq_len, d_k)
    # mask: (n_batch, 1, seq_len, seq_len)
    d_k = key.shape[-1]
    attention_score = torch.matmul(query, key.transpose(-2, -1)) # Q x K^T, (n_batch, h, seq_len, seq_len)
    attention_score = attention_score / math.sqrt(d_k)
    if mask is not None:
        attention_score = attention_score.masked_fill(mask==0, -1e9)
    attention_prob = F.softmax(attention_score, dim=-1) # (n_batch, h, seq_len, seq_len)
    out = torch.matmul(attention_prob, value) # (n_batch, h, seq_len, d_k)
    return out
우선 \(d_k\)를 중심으로 \(Q\)와 \(K\) 사이 행렬곱 연산을 수행하기 때문에 \(Q\), \(K\), \(V\)의 마지막 dimension은 반드시 \(d_k\)여야만 한다. 또한 attention_score의 shape는 마지막 두 dimension이 반드시 (\(\text{seq_len} \times \text{seq_len}\))이어야만 masking이 적용될 수 있기 때문에 \(Q\), \(K\), \(V\)의 마지막 직전 dimension(.shape[-2])는 반드시 \(\text{seq_len}\)이어야만 한다.
다시 forward()로 되돌아와서, calculate_attention()을 사용해 attention을 계산하고 나면 그 shape는 (\(\text{n_batch} \times h \times \text{seq_len} \times d_k\))이다. Multi-Head Attention Layer 역시 shape에 대해 멱등(Idempotent)해야만 하기 때문에, output shape는 input과 같은 (\(\text{n_batch} \times \text{seq_len} \times d_{embed}\))여야만 한다. 이를 위해 \(h\)와 \(\text{seq_len}\)의 순서를 뒤바꾸고(.transpose(1, 2)) 다시 \(h\)와 \(d_k\)를 \(d_{model}\)로 결합한다. 이후 FC Layer를 거쳐 \(d_{model}\)을 \(d_{embed}\)로 변환하게 된다.
Encoder Block으로 다시 되돌아가보자. pad mask는 Encoder 외부에서 생성할 것이므로 Encoder Block의 forward()에서 인자로 받는다. 따라서 forward()의 최종 인자는 x, mask가 된다. 한편, 이전에는 Multi-Head Attention Layer의 forward()의 인자가 1개(x)일 것으로 가정하고 code를 작성했는데, 실제로는 query, key, value를 받아야 하므로 이를 수정해준다. 이에 더해 mask 역시 인자로 받게 될 것이다. 따라서 Multi-Head Attention Layer의 forward()의 인자는 최종적으로 x, x, x, mask가 된다.
class EncoderBlock(nn.Module):

    def __init__(self, self_attention, position_ff):
        super(EncoderBlock, self).__init__()
        self.self_attention = self_attention
        self.position_ff = position_ff


    def forward(self, src, src_mask):
        out = src
        out = self.self_attention(query=out, key=out, value=out, mask=src_mask)
        out = self.position_ff(out)
        return out
mask 인자를 받기 위해 Encoder 역시 수정이 가해진다. forward()의 인자에 mask를 추가하고, 이를 각 sublayer의 forward()에 넘겨준다.
class Encoder(nn.Module):

    def __init__(self, encoder_layer, n_layer):  # n_layer: Encoder Layer의 개수
        super(Encoder, self).__init__()
        self.layers = []
        for i in range(n_layer):
            self.layers.append(copy.deepcopy(encoder_layer))


    def forward(self, src, src_mask):
        out = src
        for layer in self.layers:
            out = layer(out, src_mask)
        return out
Transformer 역시 수정해야 한다. forward()의 인자에 src_mask를 추가하고, encoder의 forward()에 넘겨준다.
class Transformer(nn.Module):

    ...

    def encode(self, src, src_mask):
        out = self.encoder(src, src_mask)
        return out


    def forward(self, src, tgt, src_mask):
        encoder_out = self.encode(src, src_mask)
        y = self.decode(tgt, encoder_out)
        return y

    ...
Pad Mask Code in Pytorch
그동안 생략했던 과정인 pad masking을 생성하는 make_pad_mask()이다. 인자로는 query와 key를 받는데, 각각은 \(\text{n_batch} \times \text{seq_len}\)의 shape를 갖는다. embedding을 획득하기도 전, token sequence상태로 들어오는 것이다. 여기서 <pad>의 index를 의미하는 pad_idx(대개 1)와 일치하는 token들은 모두 0, 그 외에는 모두 1인 mask를 생성한다.
def make_pad_mask(self query, key, pad_idx=1):
    # query: (n_batch, query_seq_len)
    # key: (n_batch, key_seq_len)
    query_seq_len, key_seq_len = query.size(1), key.size(1)

    key_mask = key.ne(pad_idx).unsqueeze(1).unsqueeze(2)  # (n_batch, 1, 1, key_seq_len)
    key_mask = key_mask.repeat(1, 1, query_seq_len, 1)    # (n_batch, 1, query_seq_len, key_seq_len)

    query_mask = query.ne(pad_idx).unsqueeze(1).unsqueeze(3)  # (n_batch, 1, query_seq_len, 1)
    query_mask = query_mask.repeat(1, 1, 1, key_seq_len)  # (n_batch, 1, query_seq_len, key_seq_len)

    mask = key_mask & query_mask
    mask.requires_grad = False
    return mask
지금까지 Encoder에서 다뤘던 pad masking은 모두 동일한 문장 내에서 이뤄지는 Self-Attention이었다. 이러한 Self-Attention의 경우에는 make_pad_mask()의 인자로 들어오는 query와 key가 동일할 것이다. 반면, 서로 다른 문장(예를 들면 source, target) 사이 이뤄지는 Cross-Attention의 경우, query는 source, key는 target과 같이 서로 다른 값이 들어올 수 있다.
def make_src_mask(self, src):
    pad_mask = self.make_pad_mask(src, src)
    return pad_mask
pad mask는 개념적으로 Encoder 내부에서 생성하는 것은 아니기 때문에, Transformer의 method로 위치시킨다.
Position-wise Feed Forward Layer
단순하게 2개의 FC Layer를 갖는 Layer이다. 각 FC Layer는 (\(d_{embed} \times d_{ff}\)), (\(d_{ff} \times d_{embed}\))의 weight matrix를 갖는다. 즉, Feed Forward Layer 역시 shape에 대해 멱등(Idempotent)하다. 다음 Encoder Block에게 shape를 유지한 채 넘겨줘야 하기 때문이다. 정리하자면, Feed Forward Layer는 Multi-Head Attention Layer의 output을 input으로 받아 연산을 수행하고, 다음 Encoder Block에게 output을 넘겨준다. 논문에서의 수식을 참고하면 첫번째 FC Layer의 output에 ReLU()를 적용하게 된다.
code로 구현하면 다음과 같다.
class PositionWiseFeedForwardLayer(nn.Module):

    def __init__(self, fc1, fc2):
        super(PositionWiseFeedForwardLayer, self).__init__()
        self.fc1 = fc1   # (d_embed, d_ff)
        self.relu = nn.ReLU()
        self.fc2 = fc2 # (d_ff, d_embed)


    def forward(self, x):
        out = x
        out = self.fc1(out)
        out = self.relu(out)
        out = self.fc2(out)
        return out
생성자의 인자로 받는 두 FC Layer는 (\(d_{embed} \times d_{ff}\)), (\(d_{ff} \times d_{embed}\))의 shape를 가져야만 한다.
Residual Connection Layer
Encoder Block의 구조를 다시 가져와 살펴보자.

Encoder Block은 위에서 다뤘던 Multi-Head Attention Layer와 Position-wise Feed-Forwad Layer로 구성된다. 그러나 사실은 Encoder Block을 구성하는 두 layer는 Residual Connection으로 둘러싸여 있다. Residual Connection이라는 것은 정말 단순하다. \(y = f(x)\)를 \(y=f(x)+x\)로 변경하는 것이다. 즉, output을 그대로 사용하지 않고, output에 input을 추가적으로 더한 값을 사용하게 된다. 이로 인해 얻을 수 있는 이점은 Back Propagation 도중 발생할 수 있는 Gradient Vanishing을 방지할 수 있다는 것이다. 개념적으로는 이 것이 전부이다. 여기에 더해 보통은 Layer Normalization과 DropOut까지 추가하지만, 본 포스팅에서는 생략한다. 간단하게 코드로 구현해보자.
class ResidualConnectionLayer(nn.Module):

    def __init__(self):
        super(ResidualConnectionLayer, self).__init__()


    def forward(self, x, sub_layer):
        out = x
        out = sub_layer(out)
        out = out + x
        return out
forward()에서 sub_layer까지 인자로 받는 구조이다.
따라서 Encoder Block의 code가 아래와 같이 변경되게 된다. residuals에 Residual Connection Layer를 2개 생성한다. forward()에서 residuals[0]은 multi_head_attention_layer를 감싸고, residuals[1]은 position_ff를 감싸게 된다.
class EncoderBlock(nn.Module):

    def __init__(self, self_attention, position_ff):
        super(EncoderBlock, self).__init__()
        self.self_attention = self_attention
        self.position_ff = position_ff
        self.residuals = [ResidualConnectionLayer() for _ in range(2)]


    def forward(self, src, src_mask):
        out = src
        out = self.residuals[0](out, lambda out: self.self_attention(query=out, key=out, value=out, mask=src_mask))
        out = self.residuals[1](out, self.position_ff)
        return out
Residual Connection Layer의 forward()에 sub_layer를 전달할 때에는 대개 해당 layer 자체를 넘겨주면 되지만, 필요한 경우에 따라 lambda 식의 형태로 전달할 수도 있다. 대표적으로 Multi-Head Attention Layer와 같이 forward()가 단순하게 x와 같은 인자 1개만 받는 경우가 아닐 때가 있다.
Decoder
Transformer의 Decoder는 Encoder를 완벽히 이해했다면 큰 무리없이 이해할 수 있다. Encoder의 Layer를 그대로 가져와 사용하고, 몇몇 변경만 가해주는 정도이기 때문이다. Decoder를 이해하기 위해서는 Decoder의 input과 output이 무엇인지부터 명확히 해 어떤 역할을 하는 module인지 파악하는 것이 우선이다.

가장 처음에 Transformer의 전체 구조를 이야기할 때 봤던 Decoder의 구조이다. context와 Some Sentence를 input으로 받아 Output Sentence를 출력한다. context는 Encoder의 output이라는 것은 이해했다. Transformer model의 목적을 다시 상기시켜 보자. input sentence를 받아와 output sentence를 만들어내는 model이다. 대표적으로 번역과 같은 task를 처리할 수 있을 것이다. 영한 번역이라고 가정한다면, Encoder는 context를 생성해내는 것, 즉 input sentence에서 영어 context를 압축해 담아내는 것을 목적으로 하고, Decoder는 영어 context를 활용해 한글로 된 output sentence를 만들어내는 것을 목적으로 한다. 그렇다면 Decoder는 input으로 context만 받아야 하지, 왜 다른 추가적인 sentence를 받을까? 또 이 sentence는 도대체 무엇일까? 이에 대해 알아보자.
Decoder’s Input
Context
위에서 언급했듯이, Decoder의 input으로는 context와 sentence가 있다. context는 Encoder에서 생성된 것이다. Encoder 내부에서 Multi-Head Attention Layer나 Position-wise Feed-Forward Layer 모두 shape에 멱등(Idempotent)했음을 주목하자. 때문에 이 두 Layer로 구성된 Encoder Block도 shape에 멱등(Idempotent)할 것이고, Encoder Block이 쌓인 Encoder 전체도 shape에 멱등(Idempotent)할 것이다. 따라서 Encoder의 output인 context는 Encoder의 input인 sentence와 동일한 shape를 갖는다. 이 점만 기억하고 넘어가면, 이후 Decoder에서 context를 사용할 때 이해가 훨씬 수월하다. 이제 Decoder input 중 context가 아닌 추가적인 sentence에 대해서 알아보자.
Teacher Forcing
Decoder의 input에 추가적으로 들어오는 sentence를 이해하기 위해서는 Teacher Forcing라는 개념에 대해 알고 있어야 한다. RNN 계열이든, Transformer 계얼이든 번역 model이 있다고 생각해보자. 결국에는 새로운 sentence를 생성해내야만 한다. 힘들게 만들어낸 model이 초창기 학습을 진행하는 상황이다. random하게 초기화된 parameter들의 값 때문에 엉터리 결과가 나올 것이다. RNN으로 생각을 해봤을 때, 첫번째 token을 생성해내고 이를 다음 token을 생성할 때의 input으로 활용하게 된다. 즉, 현재 token을 생성할 때 이전에 생성한 token들을 활용하는 것이다. 그런데 model의 학습 초반 성능은 말그대로 엉터리 결과일 것이기 떄문에, model이 도출해낸 엉터리 token을 이후 학습에 사용하게 되면 점점 결과물은 미궁으로 빠질 것이다. 이러한 현상을 방지하기 위해서 Teacher Forcing을 사용하게 된다. Teacher Forcing이란, Supervised Learning에서 label data를 input으로 활용하는 것이다. RNN으로 번역 model을 만든다고 할 때, 학습 과정에서 model이 생성해낸 token을 다음 token 생성 때 사용하는 것이 아닌, 실제 label data의 token을 사용하게 되는 것이다. 우선 정확도 100%를 달성하는 이상적인 model의 경우를 생각해보자.

우리의 예상대로 RNN 이전 cell의 output을 활용해 다음 cell에서 token을 정상적으로 생성해낼 수 있다. 그런데 이런 100%의 성능을 갖는 model은 있을 수 없다.

현실에서는, 특히나 model 학습 초창기에는 위처럼 잘못된 token을 생성해내고, 그 이후 계속적으로 잘못된 token이 생성될 것이다. 초반에 하나의 token이 잘못 도출되었다고 이후 token이 모두 다 잘못되게 나온다면 제대로 된 학습이 진행되기 힘들 것이다. 따라서 이를 위해 Teacher Forcing을 사용한다.

Teacher Forcing은 실제 labeled data(Ground Truth)를 RNN cell의 input으로 사용하는 것이다. 정확히는 Ground Truth의 [:-1]로 slicing을 한 것이다(마지막 token인 EOS token을 제외하는 것이다). 이를 통해서 model이 잘못된 token을 생성해내더라도 이후 제대로 된 token을 생성해내도록 유도할 수 있다.
하지만 이는 model 학습 과정에서 Ground Truth를 포함한 dataset을 갖고 있을 때에나 가능한 것이기에 Test나 실제로 Real-World에 Product될 때에는 model이 생성해낸 이전 token을 사용하게 된다.
이처럼 학습 과정과 실제 사용에서의 괴리가 발생하기는 하지만, model의 학습 성능을 비약적으로 향상시킬 수 있다는 점에서 많은 Encoder-Decoder 구조 model에서 사용하는 기법이다.
Teacher Forcing in Transformer (Subsequent Masking)
Teacher Forcing 개념을 이해하고 나면 Transformer Decoder에 input으로 들어오는 sentence가 어떤 것인지 이해할 수 있다. ground truth[:-1]의 sentence일 것이다. 하지만 이러한 방식으로 Teacher Forcing이 Transformer에 그대로 적용될 수 있을까? 결론부터 말하자면 그래서는 안된다. 위에서 Teacher Forcing에서 예시를 든 RNN Model은 이전 cell의 output을 이후 cell에서 사용할 수 있었다. 앞에서부터 순서대로 RNN cell이 실행되기 때문에 이러한 방식이 가능했다. 하지만 Transformer가 RNN에 비해 갖는 가장 큰 장점은 병렬 연산이 가능하다는 것이었다. 병렬 연산을 위해 ground truth의 embedding을 matrix로 만들어 input으로 그대로 사용하게 되면, Decoder에서 Self-Attention 연산을 수행하게 될 때 현재 출력해내야 하는 token의 정답까지 알고 있는 상황이 발생한다. 따라서 masking을 적용해야 한다. \(i\)번째 token을 생성해낼 때, \(1 \thicksim i-1\)의 token만 보이고, \(i+1 \thicksim\)의 token은 보이지 않도록 처리를 해야 하는 것이다. 이러한 masking 기법을 subsequent masking이라고 한다. pytorch code로 구현해보자.
def make_subsequent_mask(query, key):
    # query: (n_batch, query_seq_len)
    # key: (n_batch, key_seq_len)
    query_seq_len, key_seq_len = query.size(1), key.size(1)

    tril = np.tril(np.ones((query_seq_len, key_seq_len)), k=0).astype('uint8') # lower triangle without diagonal
    mask = torch.tensor(tril, dtype=torch.bool, requires_grad=False, device=query.device)
    return mask
make_subsequent_mask()는 np.tril()을 사용해 lower traiangle을 생성한다. 아래는 query_seq_len과 key_seq_len이 모두 10일 때, np.tril()의 결과이다.
[[1, 0, 0, 0, 0, 0, 0, 0, 0, 0],
 [1, 1, 0, 0, 0, 0, 0, 0, 0, 0],
 [1, 1, 1, 0, 0, 0, 0, 0, 0, 0],
 [1, 1, 1, 1, 0, 0, 0, 0, 0, 0],
 [1, 1, 1, 1, 1, 0, 0, 0, 0, 0],
 [1, 1, 1, 1, 1, 1, 0, 0, 0, 0],
 [1, 1, 1, 1, 1, 1, 1, 0, 0, 0],
 [1, 1, 1, 1, 1, 1, 1, 1, 0, 0],
 [1, 1, 1, 1, 1, 1, 1, 1, 1, 0],
 [1, 1, 1, 1, 1, 1, 1, 1, 1, 1]]
0번째 token은 자기 자신밖에 보지 못하고, 1~n번째 token은 0으로 가려져 있으며, 1번째 token은 0~1번째 token밖에 보지 못하고, 2~n번째 token은 모두 0으로 가려져 있다. 최종적으로 n번째 token은 모든 token을 볼 수 있다.
이렇듯, Decoder의 mask는 subsequent masking이 적용되어야 한다. 그런데, 동시에 Encoder와 마찬가지로 pad masking역시 적용되어야 한다. 따라서, make_tgt_mask()는 다음과 같다. make_subsequent_mask()와 make_tgt_mask()는 make_src_mask()와 같이 Transformer에 method로 작성한다.
def make_tgt_mask(self, tgt):
    pad_mask = self.make_pad_mask(tgt, tgt)
    seq_mask = self.make_subsequent_mask(tgt, tgt)
    mask = pad_mask & seq_mask
    return pad_mask & seq_mask
Transformer로 다시 돌아가보자. 기존에는 Encoder에서 사용하는 pad mask(src_mask)만이 forward()을 구해야 했다면, 이제는 Decoder에서 사용할 subsequent + pad mask (tgt_mask)도 구해야 한다. forward() 내부에서 Decoder의 forward()를 호출할 때 역시 변경되는데, tgt_mask가 추가적으로 인자로 넘어가게 된다.
class Transformer(nn.Module):

    def __init__(self, encoder, decoder):
        super(Transformer, self).__init__()
        self.encoder = encoder
        self.decoder = decoder


    def encode(self, src, src_mask):
        out = self.encoder(src, src_mask)
        return out


    def decode(self, tgt, encoder_out, tgt_mask):
        out = self.decode(tgt, encoder_out, tgt_mask)
        return out


    def forward(self, src, tgt):
        src_mask = self.make_src_mask(src)
        tgt_mask = self.make_tgt_mask(tgt)
        encoder_out = self.encode(src, src_mask)
        y = self.decode(tgt, encoder_out, tgt_mask)
        return y

    ...
Decoder Block
Decoder 역시 Encoder와 마찬가지로 \(N\)개의 Decoder Block이 겹겹이 쌓인 구조이다. 이 때 주목해야 하는 점은 Encoder에서 넘어오는 context가 각 Decoder Block마다 input으로 주어진다는 것이다. 그 외에는 Encoder와 차이가 전혀 없다.

그렇다면 각 Decoder Block은 어떻게 생겼을까?

Decoder Block은 Encoder Block과 달리 Multi-Head Attention Layer가 2개가 존재한다. 첫번째 layer는 Self-Multi-Head Attention Layer라고 부르는데, 이름 그대로 Decoder의 input으로 주어지는 sentence 내부에서의 Attention을 계산한다. 이 때, 일반적인 pad masking뿐만 아니라 subsequent masking이 적용되기 떄문에 Masked-Multi-Head Attention Layer라고 부르기도 한다. 두번째 layer는 Encoder에서 넘어온 context를 Key, Value로 사용한다는 점에서 Cross-Multi-Head Attention Layer라고 부른다. 즉, Encoder의 context는 Decoder 내 각 Decoder Block의 Cross-Multi-Head Attention Layer에서 사용되게 된다. 마지막 Position-wise Feed-Forward Layer는 Encoder Block의 것과 완전히 동일하므로 설명을 생략한다. 이제 두 Multi-Head Attention Layer에 대해서 Encoder의 것과 비교하며 특징을 살펴보자.
Self-Multi-Head Attention Layer
Self-Multi-Head Attention Layer에 대한 설명은 특별한 것이 없다. Encoder의 것과 완전히 동일한데 다만 mask로 들어오는 인자가 일반적인 pad masking에 더해 subsequent masking까지 적용되어 있다는 점만이 차이일 뿐이다. 즉, 이 layer는 Self-Attention을 수행하는 layer이다. 즉, Ground Truth sentence에 내부에서의 Attention을 계산한다. 이는 다음 Multi-Head Attention Layer와 가장 큰 차이점이다.
Cross-Multi-Head Attention Layer
Decoder의 가장 핵심적인 부분이다. Decoder Block 내 이전 Self-Multi-Head Attention Layer에서 넘어온 output을 input으로 받는다. 여기에 추가적으로 Encoder에서 도출된 context도 input으로 받는다. 두 input의 사용 용도는 완전히 다르다. Decoder Block 내부에서 전달된 input(Self-Multi-Head Attention Layer의 output)은 Query로써 사용하고, Encoder에서 넘어온 context는 Key와 Value로써 사용하게 된다. 이 점을 반드시 기억하고 넘어가자. 정리하자면 Decoder Block의 2번째 layer인 Cross-Multi-Head Attention Layer는 Decoder에서 넘어온 input의 Encoder에서 넘어온 input에 대한 Attention을 계산하는 것이다. 따라서 Self-Attention이 아닌 Cross-Attention이다. 우리가 Decoder에서 도출해내고자 하는 최종 output은 teacher forcing으로 넘어온 sentence와 최대한 유사한 predicted sentence이다. 따라서 Decoder Block 내 이전 layer에서 넘어오는 input이 Query가 되고, 이에 상응하는 Encoder에서의 Attention을 찾기 위해 context를 Key, Value로 두게 된다. 번역 task를 생각했을 때 가장 직관적으로 와닿는다. 만약 영한 번역을 수행하고자 한다면, Encoder의 input은 영어 sentence일 것이고, Encoder가 도출해낸 context는 영어에 대한 context일 것이다. Decoder의 input(teacher forcing)과 output은 한글 sentence일 것이다. 따라서 이 경우에는 Query가 한글, Key와 Value는 영어가 되어야 한다.
지금 와서 Multi-Head Attention Layer의 구현을 보면 이전과 다르게 보일 것이다. query, key, value를 굳이 각각 별개의 인자로 받은 이유는 Self-Attention뿐만이 아닌 Cross-Attention에도 활용하기 위함이다.
 class MultiHeadAttentionLayer(nn.Module):

        ...

    def forward(self, query, key, value, mask=None):

        ...
Decoder Code in Pytorch
이제 Decoder와 Decoder Block에 대한 code를 완성해보자. Position-wise Feed Forward Network와 Residual Connection Layer는 모두 동일하게 사용한다.
class Decoder(nn.Module):

    def __init__(self, decoder_block, n_layer):
        super(Decoder, self).__init__()
        self.n_layer = n_layer
        self.layers = nn.ModuleList([copy.deepcopy(decoder_block) for _ in range(self.n_layer)])


    def forward(self, tgt, encoder_out, tgt_mask, src_tgt_mask):
        out = tgt
        for layer in self.layers:
            out = layer(out, encoder_out, tgt_mask, src_tgt_mask)
        return out
가장 주목할 부분은 encoder_out이다. Encoder에서 생성된 최종 output은 모든 Decoder Block 내부의 Cross-Multi-Head Attention Layer에 Key, Value로써 주어진다.
두 번째로 주목할 부분은 인자로 주어지는 두 mask인 tgt_mask, src_tgt_mask이다. tgt_mask는 Decoder의 input으로 주어지는 target sentence의 pad masking과 subsequent masking이다. 즉, 위에서 작성했던 make_tgt_mask()로 생성된 mask이다. 이는 Self-Multi-Head Attention Layer에서 사용된다. 반면, src_tgt_mask는 Self-Multi-Head Attention Layer에서 넘어온 query, Encoder에서 넘어온 key, value 사이의 pad masking이다. 이를 구하는 make_src_tgt_mask()를 작성한다. 이 때를 위해 make_pad_mask()를 query와 key를 분리해서 인자로 받도록 한 것이다.
def make_src_tgt_mask(self, src, tgt):
    pad_mask = self.make_pad_mask(tgt, src)
    return pad_mask

def make_pad_mask(self, query, key):

    ...
Decoder Block은 Encoder Block과 큰 차이가 없다. forward()에서 self_attention와 달리 cross_attention의 key, value는 encoder_out이라는 것, 각각 mask가 tgt_mask, src_tgt_mask라는 것만 주의하면 된다.
class DecoderBlock(nn.Module):

    def __init__(self, self_attention, cross_attention, position_ff):
        super(DecoderBlock, self).__init__()
        self.self_attention = self_attention
        self.cross_attention = cross_attention
        self.position_ff = position_ff
        self.residuals = [ResidualConnectionLayer() for _ in range(3)]


    def forward(self, tgt, encoder_out, tgt_mask, src_tgt_mask):
        out = tgt
        out = self.residuals[0](out, lambda out: self.self_attention(query=out, key=out, value=out, mask=tgt_mask))
        out = self.residuals[1](out, lambda out: self.cross_attention(query=out, key=encoder_out, value=encoder_out, mask=src_tgt_mask))
        out = self.residuals[2](out, self.position_ff)
        return out
Transformer도 다음과 같이 수정된다. src_tgt_mask를 포함해 다음과 같이 수정된다.
class Transformer(nn.Module):

    ...

    def decode(self, tgt, encoder_out, tgt_mask, src_tgt_mask):
        out = self.decode(tgt, encoder_out, tgt_mask, src_tgt_mask)
        return out


    def forward(self, src, tgt):
        src_mask = self.make_src_mask(src)
        tgt_mask = self.make_tgt_mask(tgt)
        src_tgt_mask = self.make_src_tgt_mask(src, tgt)
        encoder_out = self.encode(src, src_mask)
        y = self.decode(tgt, encoder_out, tgt_mask, src_tgt_mask)
        return y

    ...
Transformer’s Input (Positional Encoding)
지금까지 Encoder와 Decoder의 내부 구조가 어떻게 이루어져 있는지 분석하고 code로 구현까지 마쳤다. 사실 Transformer의 input으로 들어오는 문장의 shape는 \((\text{n_batch} \times \text{seq_len})\)인데, Encoder와 Decoder의 input은 \(\text{n_batch} \times \text{seq_len} \times d_{embed}\)의 shape를 가진 것으로 가정했다. 이는 Embedding 과정을 생략했기 때문이다. 사실 Transformer는 source / target sentence에 대한 각각의 Embedding이 포함된다. Transformer의 Embedding은 단순하게 Token Embedding과 Positional Encoding의 sequential로 구성된다. code는 단순하다.
class TransformerEmbedding(nn.Module):

    def __init__(self, token_embed, pos_embed):
        super(TransformerEmbedding, self).__init__()
        self.embedding = nn.Sequential(token_embed, pos_embed)


    def forward(self, x):
        out = self.embedding(x)
        return out
Token Embedding 역시 단순하다. vocabulary와 \(d_{embed}\)를 사용해 embedding을 생성해낸다. 주목할 점은 embedding에도 scaling을 적용한다는 점이다. forward()에서 \(\sqrt{d_{embed}}\)를 곱해주게 된다.
class TokenEmbedding(nn.Module):

    def __init__(self, d_embed, vocab_size):
        super(TokenEmbedding, self).__init__()
        self.embedding = nn.Embedding(vocab_size, d_embed)
        self.d_embed = d_embed


    def forward(self, x):
        out = self.embedding(x) * math.sqrt(self.d_embed)
        return out
마지막으로 Positional Encoding을 살펴보자.
class PositionalEncoding(nn.Module):

    def __init__(self, d_embed, max_len=256, device=torch.device("cpu")):
        super(PositionalEncoding, self).__init__()
        encoding = torch.zeros(max_len, d_embed)
        encoding.requires_grad = False
        position = torch.arange(0, max_len).float().unsqueeze(1)
        div_term = torch.exp(torch.arange(0, d_embed, 2) * -(math.log(10000.0) / d_embed))
        encoding[:, 0::2] = torch.sin(position * div_term)
        encoding[:, 1::2] = torch.cos(position * div_term)
        self.encoding = encoding.unsqueeze(0).to(device)


    def forward(self, x):
        _, seq_len, _ = x.size()
        pos_embed = self.encoding[:, :seq_len, :]
        out = x + pos_embed
        return out
code가 다소 난해할 수 있는데, 직관적으로 작동 원리만 이해하고 넘어가도 충분하다. PositionalEncoding의 목적은 positional 정보(token index number 등)를 정규화시키기 위한 것이다. 단순하게 index number를 positionalEncoding으로 사용하게 될 경우, 만약 training data에서는 최대 문장의 길이가 30이었는데 test data에서 길이 50인 문장이 나오게 된다면 30~49의 index는 model이 학습한 적이 없는 정보가 된다. 이는 제대로 된 성능을 기대하기 어려우므로, positonal 정보를 일정한 범위 안의 실수로 제약해두는 것이다. 여기서 \(sin\)함수와 \(cos\)함수를 사용하는데, 짝수 index에는 \(sin\)함수를, 홀수 index에는 \(cos\)함수를 사용하게 된다. 이를 사용할 경우 항상 -1에서 1 사이의 값만이 positional 정보로 사용되게 된다.
구현 상에서 유의할 점은 생성자에서 만든 encoding을 forward() 내부에서 slicing해 사용하게 되는데, 이 encoding이 학습되지 않도록 requires_grad=False 을 부여해야 한다는 것이다. PositionalEncoding은 학습되는 parameter가 아니기 때문이다.
이렇게 생성해낸 embedding을 Transformer에 추가해주자. code를 수정한다. forward() 내부에서 Encoder와 Decoder의 forward()를 호출할 때 각각 src_embed(src), tgt_embed(tgt)와 같이 input을 TransformerEmbedding으로 감싸 넘겨준다.
class Transformer(nn.Module):

    def __init__(self, src_embed, tgt_embed, encoder, decoder):
        super(Transformer, self).__init__()
        self.src_embed = src_embed
        self.tgt_embed = tgt_embed
        self.encoder = encoder
        self.decoder = decoder


    def encode(self, src, src_mask):
        return self.encoder(self.src_embed(src), src_mask)


    def decode(self, tgt, encoder_out, tgt_mask, src_tgt_mask):
        return self.decoder(self.tgt_embed(tgt), encoder_out, tgt_mask, src_tgt_mask)

    ...
After Decoder (Generator)
Decoder의 output이 그대로 Transformer의 최종 output이 되는 것은 아니다. Decoder의 output shape는 \(\text{n_batch} \times \text{seq_len} \times d_{embed}\)인데, 우리가 원하는 output은 target sentence인 \(\text{n_batch} \times \text{seq_len}\)이기 때문이다. 즉, Embedding이 아닌 실제 target vocab에서의 token sequence를 원하는 것이다. 이를 위해 추가적인 FC layer를 거쳐간다. 이 layer를 대개 Generator라고 부른다.
Generator가 하는 일은 Decoder output의 마지막 dimension을 \(d_{embed}\)에서 len(vocab)으로 변경하는 것이다. 이를 통해 실제 vocabulary 내 token에 대응시킬 수 있는 shape가 된다. 이후 softmax()를 사용해 각 vocabulary에 대한 확률값으로 변환하게 되는데, 이 때 log_softmax()를 사용해 성능을 향상시킨다.
Generator를 직접 Transformer code에 추가해보자.
class Transformer(nn.Module):

    def __init__(self, src_embed, tgt_embed, encoder, decoder, generator):
        super(Transformer, self).__init__()
        self.src_embed = src_embed
        self.tgt_embed = tgt_embed
        self.encoder = encoder
        self.decoder = decoder
        self.generator = generator

    ...

    def forward(self, src, tgt):
        src_mask = self.make_src_mask(src)
        tgt_mask = self.make_tgt_mask(tgt)
        src_tgt_mask = self.make_src_tgt_mask(src, tgt)
        encoder_out = self.encode(src, src_mask)
        decoder_out = self.decode(tgt, encoder_out, tgt_mask, src_tgt_mask)
        out = self.generator(decoder_out)
        out = F.log_softmax(out, dim=-1)
        return out, decoder_out

    ...
log_softmax()에서는 dim=-1이 되는데, 마지막 dimension인 len(vocab)에 대한 확률값을 구해야 하기 때문이다.
Factory Method
Transformer를 생성하는 build_model()은 다음과 같이 작성할 수 있다. 각 module의 submodule을 생성자 내부에서 생성하지 않고, 외부에서 인자로 받는 이유는 더 자유롭게 모델을 변경해 응용할 수 있게 하기 위함이다.
def build_model(src_vocab_size, tgt_vocab_size, device=torch.device("cpu"), max_len=256, d_embed=512, n_layer=6, d_model=512, h=8, d_ff=2048):
    import copy
    copy = copy.deepcopy

    src_token_embed = TokenEmbedding(
                                     d_embed = d_embed,
                                     vocab_size = src_vocab_size)
    tgt_token_embed = TokenEmbedding(
                                     d_embed = d_embed,
                                     vocab_size = tgt_vocab_size)
    pos_embed = PositionalEncoding(
                                   d_embed = d_embed,
                                   max_len = max_len,
                                   device = device)

    src_embed = TransformerEmbedding(
                                     token_embed = src_token_embed,
                                     pos_embed = copy(pos_embed))
    tgt_embed = TransformerEmbedding(
                                     token_embed = tgt_token_embed,
                                     pos_embed = copy(pos_embed))

    attention = MultiHeadAttentionLayer(
                                        d_model = d_model,
                                        h = h,
                                        qkv_fc = nn.Linear(d_embed, d_model),
                                        out_fc = nn.Linear(d_model, d_embed))
    position_ff = PositionWiseFeedForwardLayer(
                                               fc1 = nn.Linear(d_embed, d_ff),
                                               fc2 = nn.Linear(d_ff, d_embed))

    encoder_block = EncoderBlock(
                                 self_attention = copy(attention),
                                 position_ff = copy(position_ff))
    decoder_block = DecoderBlock(
                                 self_attention = copy(attention),
                                 cross_attention = copy(attention),
                                 position_ff = copy(position_ff))

    encoder = Encoder(
                      encoder_block = encoder_block,
                      n_layer = n_layer)
    decoder = Decoder(
                      decoder_block = decoder_block,
                      n_layer = n_layer)
    generator = nn.Linear(d_model, tgt_vocab_size)

    model = Transformer(
                        src_embed = src_embed,
                        tgt_embed = tgt_embed,
                        encoder = encoder,
                        decoder = decoder,
                        generator = generator).to(device)
    model.device = device

    return model
Detail
보통의 Transformer 구현에서는 \(d_{model}\)과 \(d_{embed}\)를 구분하지 않고 \(d_{model}\)로 통용한다. 하지만, 엄밀한 정의에 부합하도록 이 둘을 구분했다. 이 둘을 구분할 때에 원칙으로 삼은 기준은 단 하나로, 각 module들이 모두 shape에 대해 멱등(Idempotent)함을 보장하도록 하는 것이다. 그 외에 실제 Transformer 구현과 본 포스팅의 code와의 가장 큰 차이는 Layer Normalization과 DropOut을 생략했다는 점이다. 이는 아래 실제 GitHub code상에는 모두 정상적으로 반영되어 있다. 마지막으로 masking을 생성하는 code는 일반적인 Transformer 구현의 code와 다소 상이한데, 본 포스팅에서 사용한 code가 memory를 더 많이 소비한다는 점에서 비효율적이기 때문이다. 다만, 본 포스팅의 masking code는 tensor 사이의 broadcasting을 최소화하고, 본래 의도한 tensor의 shape를 그대로 갖고 있기 때문에 학습하는 입장에서는 더 이해가 수월할 것이기에 이를 채택했다.
Full Code
아래의 GitHub Repository에서 전체 code를 제공한다. Multi30k Dataset에 대한 training code도 포함되어 있다. 추후 jupyter notebook도 제공할 예정이다.